The post PROJECT: Stickley Small Server appeared first on Woodworking | Blog | Videos | Plans | How To.
]]>Preparing Quartersawn Stock
Round up some attractive 4/4 quartersawn white oak so you can make the four big panels for this project — the top, two side rails and the shelf. The top is large enough that if you don’t have a large planer or drum sander, you might need to glue it up in sections. While the panels are in clamps, mill the 1-3/4″-thick leg blanks from some 8/4 stock, making sure they come out flat and square. Go ahead and make blanks for the front, back and shelf rails as well as the backsplash from 3/4″ material.
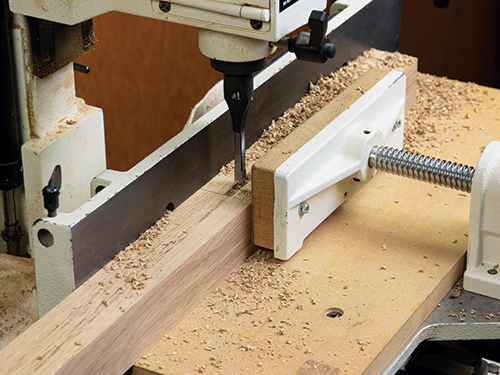
I often mutter, “Joinery before curves” and “Mortises before tenons,” and we’ll take both of those mottoes to heart with this build. Lay out the 1/4″-wide mortises as shown in the Leg Mortise/Taper Detail Drawings, and machine or chop them with your best method. Cut 1/4″-wide x 3-1/2″-long mortises on the inside of the front legs to receive the curved front rail. Start these mortises 4-1/4″ from the tops of the legs, and inset them 3/8″ from the front faces. The back rail requires 1/4″ x 4-1/2″ mortises that start 1/2″ from the top of the legs. Position them 1/2″ in from the back faces of the back of the legs so the outward face of the back rail will be flush with the back faces of the legs. The mortises for the shelf rails need to be 2-1/2″ long, and they start 7-3/4″ up from the bottom of the legs. Locate these mortises 5/8″ away from the inside edge of the leg so they will be properly positioned once the legs are tapered.
I was tempted to make the centered 11″-long mortises for the side rails with a router and edge guide, but clamping the workpiece for that operation is sometimes problematic. So, I used a 1/4″ hollow chisel in my mortising machine instead. Take note that the mortises for the side rails are only 3/4″ deep, while all the other mortises are 1″ deep.
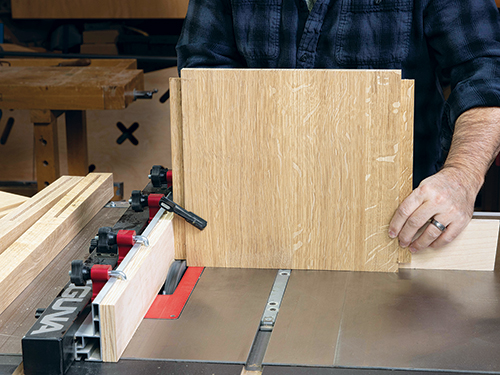
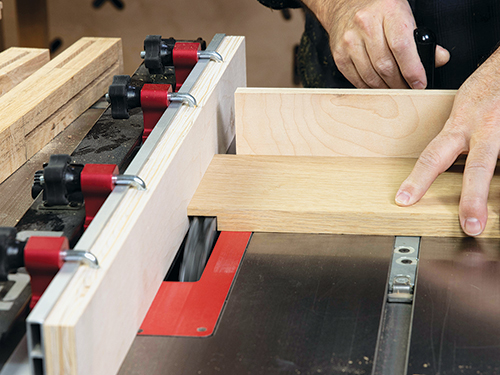
Once the mortises are chopped and cleaned out, it makes sense to work on the tenons next. When you look over the plans for this project, there are admittedly some cross-grain issues, and it would be difficult to build this form conventionally without violating some rules of wood movement. That’s why, as with the original, the grain of the side rails runs vertically and not horizontally. With a dado stack installed on the table saw, cut 3/4″-long tenons on the side panels to fit the long mortises.

Aim for an easy friction fit, because these long-grain tenons are somewhat vulnerable to breaking until the frame is glued together, if they are flexed. Then reset the rip fence for making 1″-long tenons on the front, back and shelf rails. The front rail has a simple centered “blind” tenon, however the back rail is a little different.
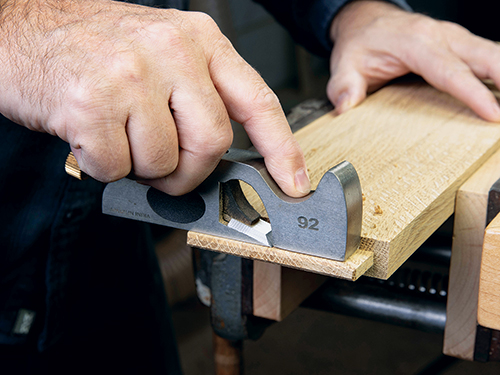
To position the outer face of the back rail flush with the outer faces of the back legs, an off set tenon is required. So, raise the blade incrementally to cut those tenons until they fit the 4-1/2″-long mortises you made in the back legs. When all the tenons are sawn, fine-tune their fit with a shoulder plane until they slide easily but not sloppily into their mortises.
More Preliminary Details
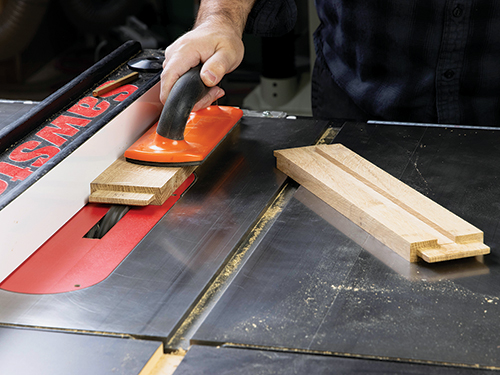
Now that the basic joinery for the server is complete, go ahead and mark out the curve on the front rail. Use a flexible strip of wood or a thin metal yardstick to lay out this line so it creates a smooth, flowing arch and leaves the front rail just 1-1/2″ wide at the apex of the curve.
Cut the arch at your band saw or with a handheld jigsaw, sawing just to the waste side of the layout line. Then fair and smooth the curve up to your layout line using a drum or spindle sander. Start with 80- or 100-grit, and work up from there.
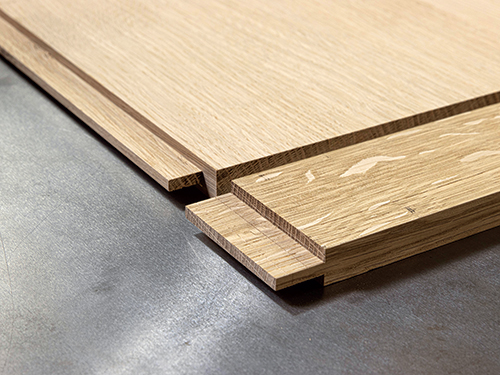
This is also a good time to cut 1/4″-deep grooves along the inside faces of the side rails to receive the shelf. Center these 3/4″-wide grooves on the rail widths. I have found it easiest to cut the grooves first, then plane the shelf’s thickness down until it fits the grooves without gaps. Then, assemble all the parts you’ve made so far to confirm the actual size of the shelf. Measuring directly off the project will give you confidence to proceed with trimming the shelf to final size.
Next up, we need to taper the legs on two sides. There’s a long taper on the front face of the front legs and on the back face of the back legs.
The left or right outer faces of all four legs have two tapers instead of one: a short one on top and a long one below it, which matches the long tapers on the adjacent faces of the legs. The four long tapers remove 1/2” of material at the bottom of the legs, reducing them to 1-1/4″ x 1-1/4″ at the floor.
These primary tapers are 25″ long, stopping just short of the upper rail joinery. The subtle top outer tapers are 4″ long, and they remove just 1/8″ of material from the top left or right faces of the legs. This gives the server “hips” when viewed from the front.
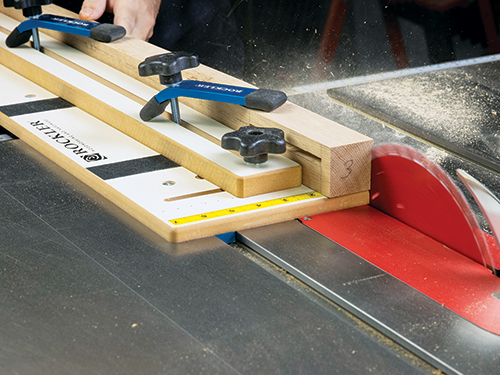
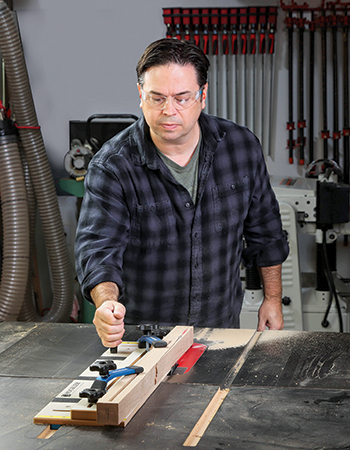
While you could certainly band-saw the tapers, I like the precision of using a tapering jig at the table saw. Mark the taper cuts carefully and saw the first long one on each leg. Then rotate the leg blank away from the blade to make the second long taper cut. The single short side taper at the top of each leg can be completed in the same way.
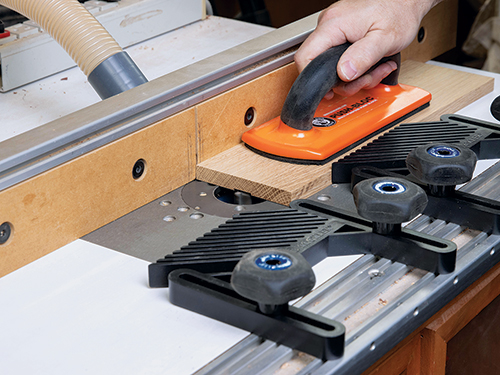
Take a little time now to ease edges of the parts you’ve made. Pay particular attention to “safe edges” or areas you don’t want to round over. Notably, these are where the back legs intersect the back rail. Likewise, the back edge of the top panel stays crisp for the addition of the backsplash. None of the shelf edges should be eased, either. Finish-sand all the parts up to 150- or 180-grit.
Assembling the Sideboard Framework
Retrieve the backsplash workpiece you made earlier so you can round both of its top corners to a 1/4″ radius before attaching it permanently to the top panel. Finish-sand both of these workpieces up to 150- or 180-grit first.
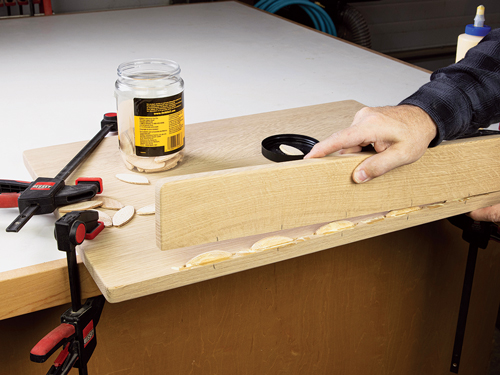
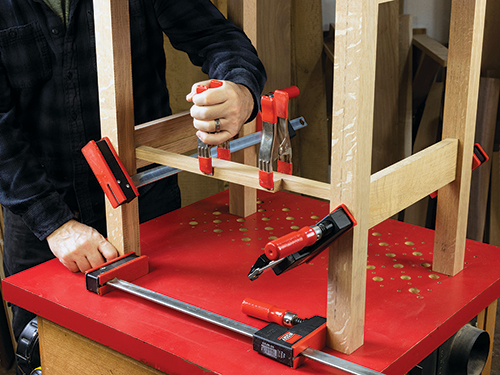
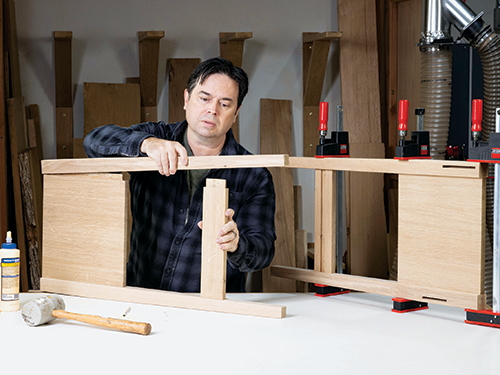
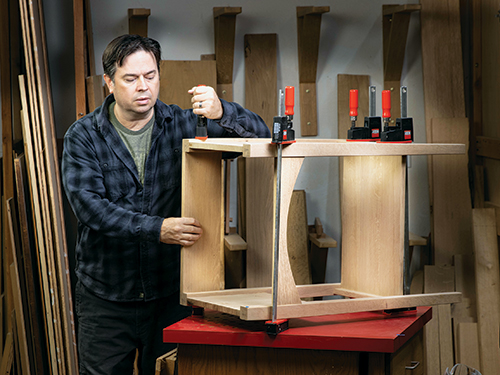
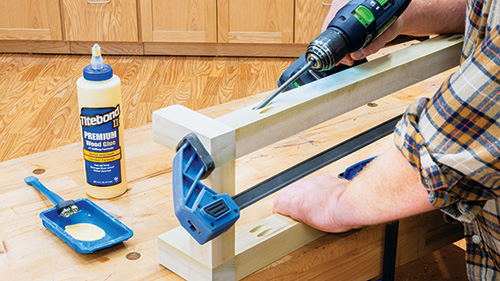
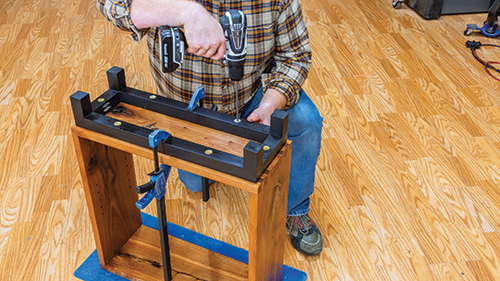
Glue alone is sufficient for strength, but I always add a row of #20 biscuits for alignment when attaching a backsplash in this manner, so cut those mating biscuit slots if you decide to do the same. Glue and clamp the backsplash to the top panel with the biscuits installed, then start assembling the server’s frame. First, create a pair of side assemblies by gluing two pairs of legs together with their side and shelf rails. Be sure the top edges of the side rails are flush with the tops of the legs as you draw the clamps tight. Allow those joints to dry.
When the side assemblies come out of the clamps, bring the two together by gluing the front and back rail tenons into their mortises and the shelf in its rail grooves. Double-check the height between the top of the front rail and the tops of the front legs, which should be 4″. Tighten the clamps, and set the frame aside to dry overnight. Then drill 7/8″-deep holes through the long tenons, centered 3/8″ from the edge of the leg, so you can peg the joints with 3/8″-diameter dowels. The front and shelf rails receive two pegs per joint.
Building a Side-Hung, Center-Guided Drawer
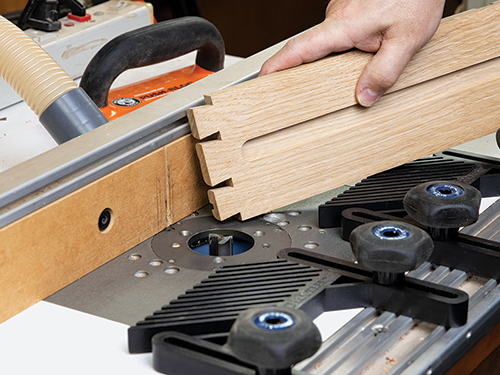
You can construct the drawer box however you like, but I thought half-blind dovetails were a proper choice for a Stickley-style reproduction. You can see the dovetail layout I used with my router dovetail jig in the Dovetail Detail Drawing. The original server appears to have a “piston-fit” drawer, but I elected to use a different Stickley hallmark: a side-hung
and center-guided drawer. While there’s a little more work constructing a drawer with these features, it promises trouble-free operation for a long time. The center runner prevents racking and conveniently acts as a drawer stop, while the top edges of the side runners are the only points of contact when sliding the drawer in or out. (To see side-hung, center-guided drawers in action, look for a video on my YouTube channel, The Thoughtful Woodworker.)
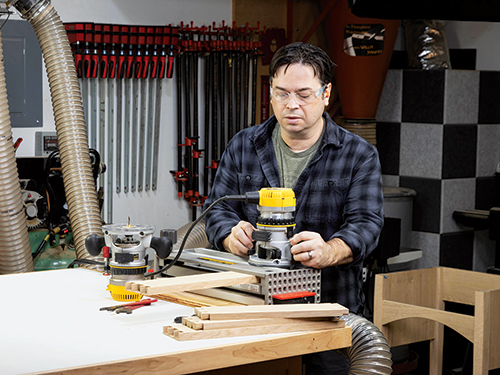
Now rout a groove in the drawer sides to receive the side runners. This 3/4″-wide groove needs to stop about 1-1/4″ from the front of the drawer sides, and it’s best cut on the router table. Make sure to use a router bit capable of making plunge cuts, as one of the grooves should be made by tipping the drawer down over the bit with the drawer standing on its side and against the router table fence (often referred to as a “drop cut”). The groove in the other drawer side can be cut in the traditional fashion, starting the groove from the back edge of the drawer instead of at the stopped end of the cut. Set the length of these groove cuts with a stop block clamped to the router table fence. The reason for routing these two side runner grooves differently — a drop cut for one and a typical groove cut for the other — is to ensure that both grooves line up exactly with one another across the drawer so it will hang evenly in its opening and slide smoothly.
Loosely assemble the drawer to check the final sizing of the drawer bottom panel. Cut a plywood panel for it to size Finish-sand all the drawer parts, then prefinish the drawer front. Once the finish dries, glue the drawer together with the bottom and divider in place.
The secret to fitting this type of drawer is to mill the 1/2″-thick filler strips with the same router table setup as the side runner grooves you just made. So, make up a pair of filler strips from scrap stock and lower the router bit height to 1/16″. Rout a groove into one face of each filler strip along its full length. Mark the edge of each filler strip that was against the router table fence “top.” Then bore three pocket holes that face the “top” edge of the filler strips for attaching the top panel later. Fasten the filler strips to the inside faces of the side rails with screws. Set their marked “top” edges flush with the top edges of the rails. Then head to the table saw and trim 1/16″ of width from the drawer parts on both the top and bottom edges to set the drawer reveal. Hand-plane the divider’s top edge flush with the other edges.
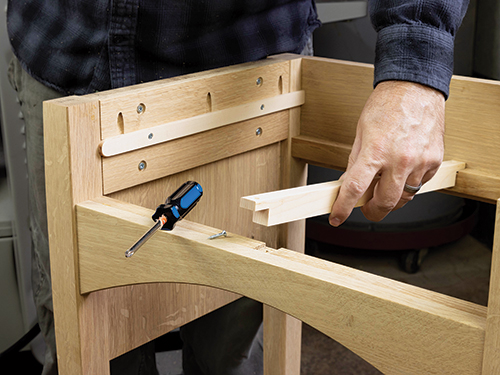
At this point we’ve laid the groundwork for a really nice drawer, and there are just a few remaining parts to build. Make up a pair of drawer runners from maple or other dimensionally stable hardwood. Size them to slide easily in the drawer grooves, and notch their back ends so they’ll fit around the back legs. Mount them in the filler strip grooves with countersunk screws.
The back of the drawer also needs a 1/4″ x 2-1/2″ centered notch to make room for the track that’s mounted underneath it. Saw that notch now. Then make the drawer track component from 1/2″ stock, and cut a tongue on one end to fit the mortise you made earlier beneath the bottom panel groove in the drawer front. The track also needs a 1/4″-deep x 2-1/2″-wide groove plowed into its bottom face and centered on its width to receive the center slide. Install the track on the drawer by fitting its tongue into the drawer front mortise and securing the back end in the notch in the drawer back with a couple of small screws.
You’re ready to install cleats in the server to support the center slide. Make up the 1″-wide cleats from scrap stock. Cut centered notches, about 1/16″ deep, into the top edges of both cleats to register the slide before fastening the cleats to the inside faces of the front and back rails with screws. Locate them so the top edge of the front cleat is flush with the top edge of the front rail. Position the back cleat’s top edge 4″ down from the top edge of the back rail.
Make up the center slide from a piece of dimensionally stable hardwood. Cut a notch into its front and back bottom edges, leaving a 3/8″-thick tongue to fit into the slide cleat notches. Set the slide into place in the server and test the drawer action. If it opens and closes smoothly, fasten the slide’s tongues to the cleats with countersunk screws.
Applying a Multi-step Finish
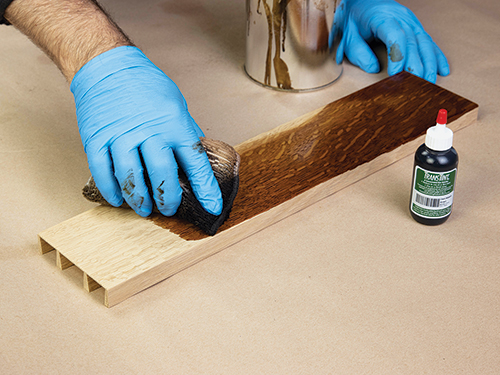
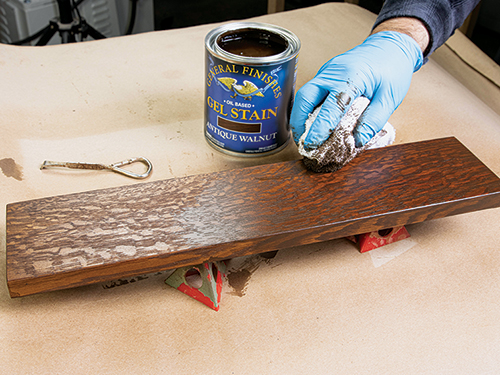
I use a multi-step stain-over-dye technique, which enhances the figure of quartersawn white oak and lends a vintage appearance to the piece. I start with TransTint Dark Mission Brown Dye. To avoid raising the grain, I mix 1-1/2 ounces of concentrated dye into a quart of a 50/50 mix of denatured alcohol and lacquer thinner. Apply the dye with a terrycloth-wrapped sponge. Adding five to 10 percent lacquer retarder will slow the drying time and help avoid lap marks. I then seal the dye with a light coat of sprayed shellac (don’t wipe or brush on the shellac, as it will resuspend the alcohol-based dye) before applying General Finishes Antique Walnut Gel Stain. I complete the finish by spraying on two coats of satin lacquer.
Attach the top panel to the server’s frame by driving 1-1/4″ pocket screws up into the filler strip pocket holes. You will notice that I added dowel pins to the tops of the front legs. They are optional but do help to register the top evenly. Complete this lovely little server by installing a reproduction Stickley drawer pull, centered on the drawer front.
Click Here for the Drawings and Materials List.
The post PROJECT: Stickley Small Server appeared first on Woodworking | Blog | Videos | Plans | How To.
]]>The post PROJECT: Slab-built Bookcase appeared first on Woodworking | Blog | Videos | Plans | How To.
]]>Since this sturdy bookcase has fairly simply styling, I thought resawing a unique slab might provide a chance to spice up the design with thicker components, showier grain and distressed figure. So I went to a local sawmill and selected a slab of red elm — it’s a species you won’t find at many lumberyards. I think its strong grain pattern, natural defects and warm color look great. The large box joints on the corners of the carcass complement the bookcase’s black, stocky base to give the project a contemporary look. Here’s a design that should work well with many home decors.
Selecting the Slab
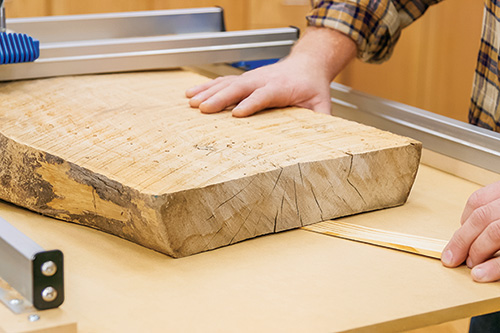
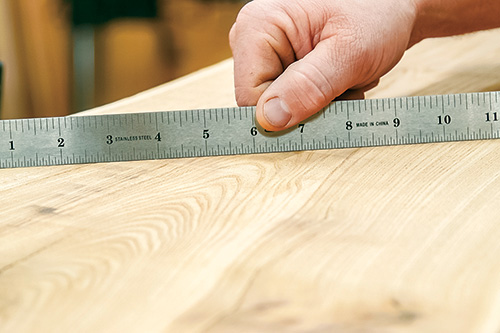
When I had my piece of red elm picked out, I made sure to take note of its moisture content. Material around 12 percent or less moisture content is ideal for furniture building, and mine was dry enough for immediate use. The slab I bought was 7 ft long and about 14″ wide. I checked for any embedded metal objects with a metal detector and then rough-cut the plank into three sections that were about 26″ long.
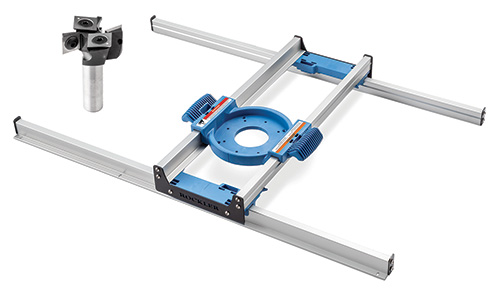
I sized my pieces, in part, to fit into Rockler’s soon-to-be-released Benchtop Slab Flattening Jig. It fits workpieces up to 18″ wide, 28″ long and 1-3/4″ thick. My slab was about 2-3/8″ thick and had a slight crown to it, but that was no problem for this slab-flattening system. One of the unique features of this aluminum-railed jig is that it can be shimmed up to any height to match the thickness of the slab for surfacing. I raised the jig by inserting strips of 3/4″ MDF under its rails on top of the jig’s MDF substrate.
Flattening Both Sides
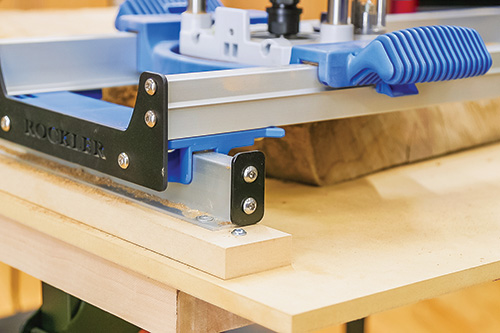
When preparing a slab for flattening, it’s important to stabilize and secure it to the jig’s MDF or plywood substrate so it can’t shift. I used a combination of shims and blocking, hot-glued to the substrate and the slab sections, to lock things down.
With a 1-1/2″-diameter carbide-insert spoil bit installed in my mid-size router, and the router mounted to the jig’s reinforced plastic router sled, I was able to easily remove the rough surface of the wood and eliminate the cupping/crowning. The process to flatten a slab in this jig is simple: Slide the router carriage back and forth on the jig’s aluminum rails, taking off about 1/8″ of material or less of thickness at a time.

After one side is flat, you could flip the slab over and repeat the flattening process to create a second smooth face. That might be really helpful if you don’t own a planer. But since I do, I ran the slab sections through my planer at this point with the flattened faces down to reduce their thickness to 2-3/16″. This way, I could resaw them to achieve the 1″ stock thickness I needed plus account for the material lost to the blade kerf and a bit of cleanup.
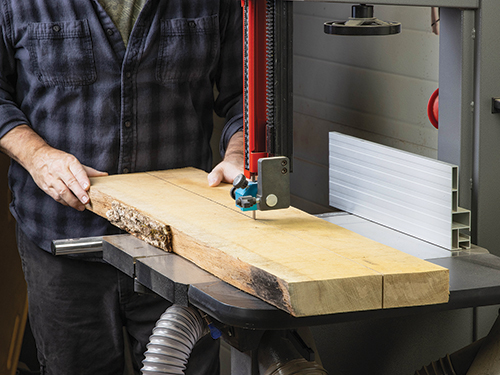
Once the faces of my slabs were flat, smooth and parallel to each other, it was time to work on their live edges. At the table saw, I used Rockler’s Straight-Line Rip Hold-Down Clamps attached to a plywood sled to rip one irregular edge off of each slab. I cut the opposite edges off using the rip fence, leaving each piece about 1/2″ wider than the Material List dimensions. I squared up their ends at the miter saw and kept them a tad overly long.
On to Resawing, Gap-filling
It’s sometimes easier with modestly powered band saws to first begin a resaw cut at the table saw, making a deep cut into both edges. That’s what I did here, which reduced what would be left for the band saw to finish up.
After making the table saw cuts along the slab’s centerlines, I took them over to the band saw and split them the rest of the way, turning three thicker pieces into six thinner ones.
I cleaned up the six sawn faces with one more pass through my planer, which brought them all to 1″ thickness. But you could use the flattening jig instead, or even a belt sander or a bench plane. It’s up to you. The important thing is, make sure the stock thickness for the bookcase’s top, bottom and sides match.
One of the reasons I selected this slab was because of the unique cracks and voids in it. I filled those defects with a black tinted epoxy designed for this application.
After a few hours of curing, the epoxy was ready to sand flat, which I did with my random orbit sander. Then I trimmed the bookcase’s top, bottom and sides to final size.
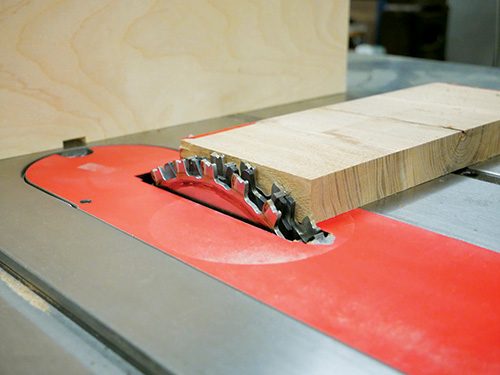
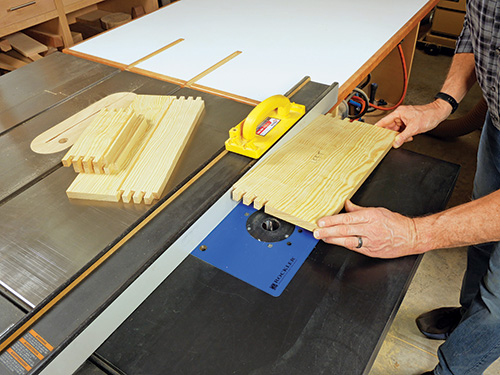
Cutting Box Joints
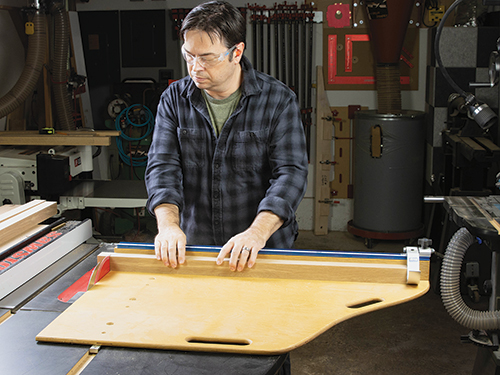
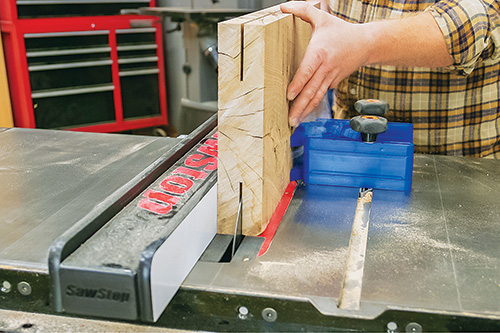
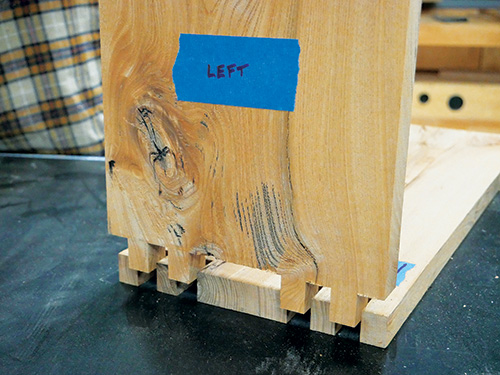
This bookcase features an irregular box joint pattern on the corners to add some visual interest as well as strength, since the project has no back panel. I cut my box joints using the old tried-and-true shop made “miter gauge” jig. It consists of a piece of 3/4″ plywood attached to my miter gauge’s fence with a 3/4″ x 1″ wooden key installed in a notch in its bottom edge. I chose a piece of plywood measuring roughly 12″ x 16″ for the jig fence — it was large enough to provide plenty of vertical and horizontal support for these large bookcase components, particularly when two of them need to be standing side by side on the jig for cutting the box joints. With a 3/4″-wide dado stack installed in the table saw, I set the height a hair above 1″, so the pins of the joints would extend just a bit past the workpiece faces when assembled. (I think it’s easier to level those flush than have the pins come up short and need to plane the whole faces of the parts instead.)
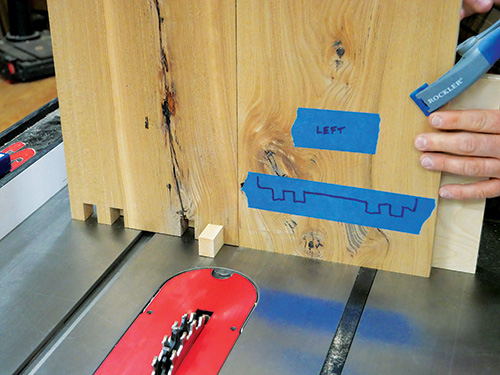
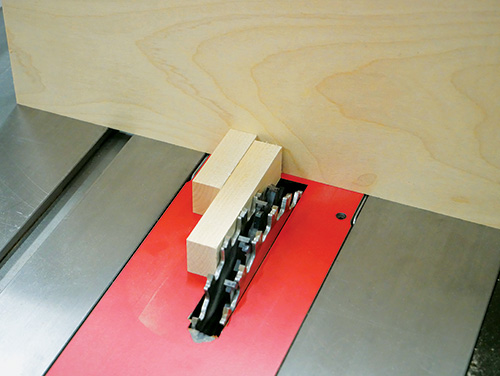
I cut a 3/4″ slot through the edge of the jig’s fence, about halfway along its length, for the wooden key. Then I made up a piece of 3/4″ x 1″ key stock about 4″ long. I cut it in half and installed one piece in the jig’s notch so it was flush to the back face of the fence and projected outward.
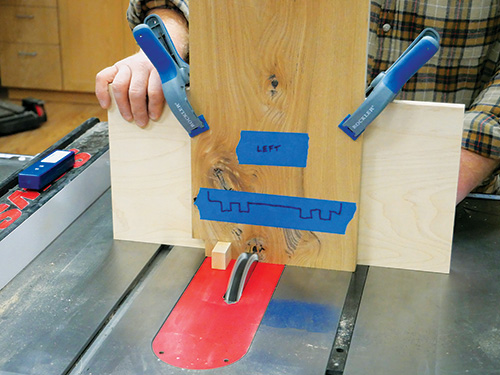
To prepare the box joint jig, set the second key against the first key on its left side (looking down from above) to act as a spacer, and place the jig fence against the miter gauge fence with the miter gauge in your saw’s left miter slot. Slide the fence assembly over so the spacer key touches the right side of the dado blade. Holding it carefully in this position, fasten the miter gauge to the box joint jig with several screws driven through both fences. Then remove the spacer key and cut a second notch through the jig fence. The distance between the jig’s key and the blade must match the width of the blade precisely, or the joints will be difficult to assemble. Accurate setup is really crucial here!
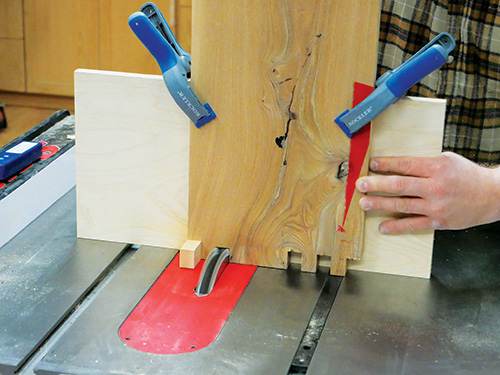
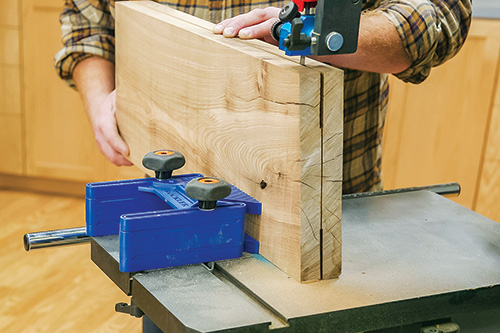
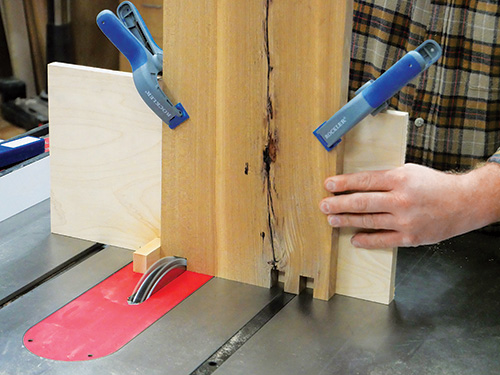
I used masking tape to lay out my box joint pattern on each of the bookcase’s top, bottom and side workpieces to help avoid confusion — no room for mistakes here on one-of-a-kind lumber! The tape layouts are merely visual guides, not exact templates for cutting.
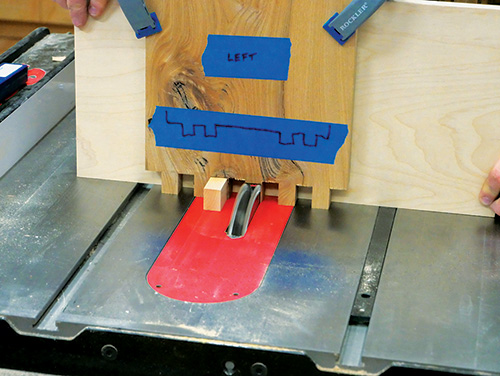
As you can see in the Box Joint Layout Drawing, the 3/4″-wide pins are spaced between 3/4″-wide slots, and there’s a 3″-wide “pin” in the middle of the pattern on the bookcase top and bottom panels. I cut the joints on the ends of the top and bottom panels first, indexing each slot cut by fitting it over the jig’s key. Notice that you cut two slots in from each edge of these parts to form two thin pins. What’s left in the middle is the wider pin. Once the top and bottom panels are cut, use them to index the first slot cuts on the edges of the bookcase sides. It’s typical box-joint cutting procedure. Finish cutting the wider center slots by removing the waste in several passes.
Assembly Time!
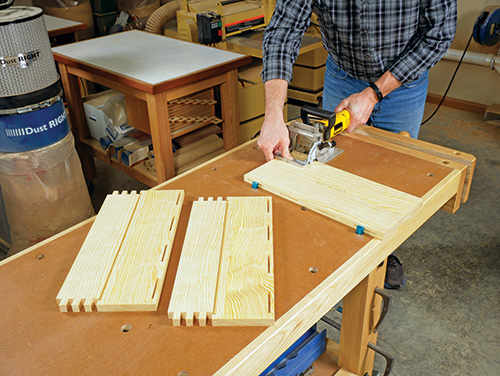
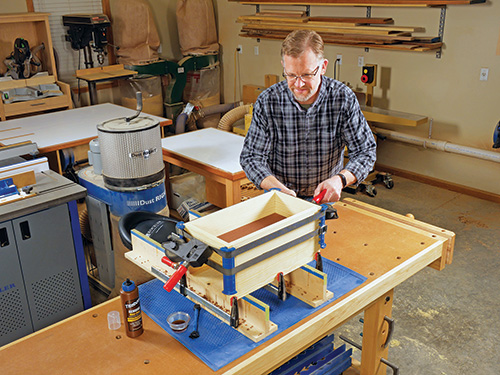
With the tricky step now behind you, dry-fit the corner joints to make sure they slip together — if you made the jig correctly and worked carefully, they will!
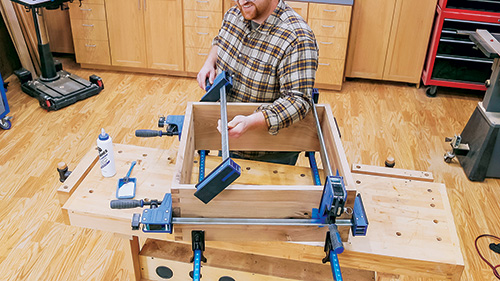
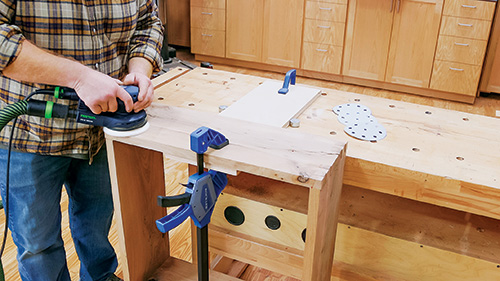
Then I disassembled the carcass, gave all four parts a finish-sanding up to 220-grit and brought them together one last time with glue and clamps. When the glue dried, I flattened the protruding pins with 60-grit abrasive in my random orbit sander, then finish-sanded those areas again.
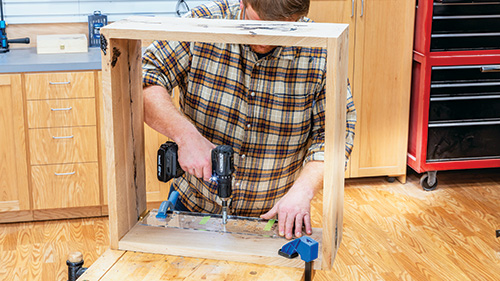
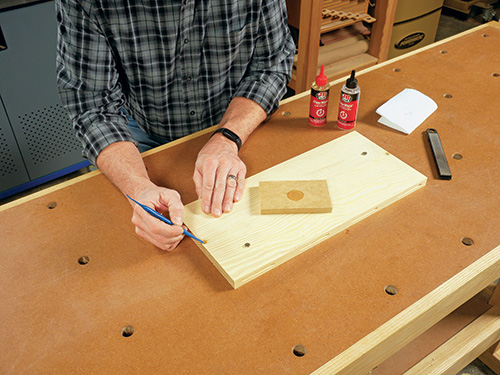
I wanted the bookcase shelf to be adjustable, so it was time to pull out my Rockler shelf pin jig and drill/driver to bore the 1/4″ shelf pin holes. Make sure all the rows of holes you drill align with one another so the shelf will sit evenly.
The base’s legs and short and long stretchers are simply 1-1/2″ x 1-1/2″ stock joined with pocket screws and glue. Since I would be painting the base, I just milled down economical 8/4 poplar for these parts. Once you’ve got the components cut to size and shape, fasten pairs of legs to each short stretcher with glue and pocket screws, orienting the pocket holes so they’re inside the base where they won’t be seen.
Then join these base end subassemblies to the long stretchers, again hiding the pocket holes on the back sides of the parts. When the glue dried, I sanded the base and brushed on two coats of General Finishes Lamp Black Milk Paint to wrap up its construction.
Finishing Up
This bookcase will receive lots of use in my busy home, so I opted to finish the carcass and shelf with a hard wax oil. It’s easy to apply by hand, and it buffs beautifully to a soft luster. It’s also easy to repair down the road by simply wiping more finish on again.
Once the paint and finish thoroughly dried, I bored 1/4″-deep countersunk holes into the bottom of the base stretchers, centered the base on the bookcase’s bottom panel and fastened the components together with 2″ wood screws.
Now grab some metal shelf pins and install the shelf at a height that works for you. I hope you’ll enjoy this rugged and attractive bookcase as much as I do!
The post PROJECT: Slab-built Bookcase appeared first on Woodworking | Blog | Videos | Plans | How To.
]]>The post PROJECT: Gluing Supplies Caddy appeared first on Woodworking | Blog | Videos | Plans | How To.
]]>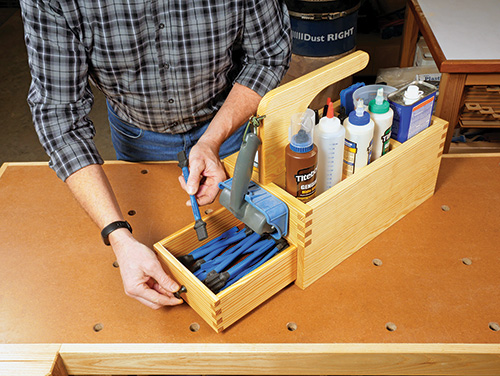
All of this stuff has needed organization for some time, and with this gluing supplies caddy, I think I have the solution. On top it’s amply sized to hold all the glue options, plus a quart of mineral spirits for checking for glue splotches and a small pail and sponge for cleaning up squeeze-out. Underneath, there’s a drawer for storing a bunch of glue brushes, a putty knife and my new Rockler glue bottle caps. The drawer is divided and slides out from either the front or back of the caddy to make it easier to find what I need. It’s held closed with pairs of rare-earth magnets to keep it from sliding open when I carry the caddy from where I’ll keep it to the bench for use. If your gluing supplies could use tidying up too, that’s a good excuse to commit some energy and a bit of lumber to this project on a Saturday morning sometime soon.
Building the Carcass
Get this build underway by gluing up panels for the carcass sides from 3/4″ stock, as needed. Rip and crosscut them to final size, according to the Material List. Then cut a pair of workpieces for the carcass front and back to size.
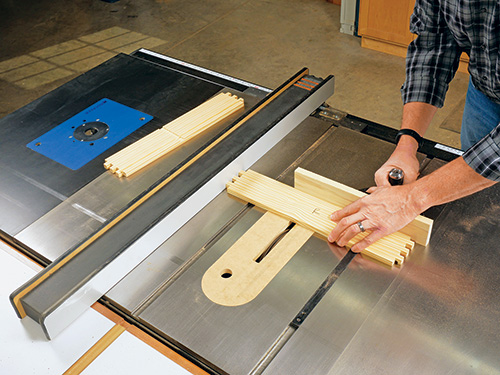
The front, back and side panels connect with 1/2″ box joints. I made them on the router table with Rockler’s box joint jig and a 1/2″-dia. upcut spiral bit. But, you could also make them on the table saw with a 1/2″-wide dado blade and a shop-made jig. Raise the bit or blade to 3/4″ so the pins and slots of the joints will enable the workpieces to mesh completely together. Start the joints with a pin at the top edges of the front and back pieces, and machine the pattern across the full width of these two parts. Then use them as spacers to mill a mating joint on the top edges of both side panels. Here, there should be a slot that starts the pattern. Mill four slots and three pins only.
Next, install a 1/4″ straight or spiral bit in your router table so you can plow 1/4″-deep grooves on the inside faces of the front, back and sides for the caddy’s top deck. Adjust your router table’s fence so these grooves align with the bottom edge of the bottom pin on the front and back panels. Plow them the full length of the workpieces.
Use the same router table setup to plow grooves for the deck on the side panels. This time, however, mark the cutting limits of the router bit on the fence so you can start and stop these groove cuts 1/2″ in from the front and back ends of the side panels in order to hide them when the carcass is assembled. Square up the ends of the grooves with a chisel.
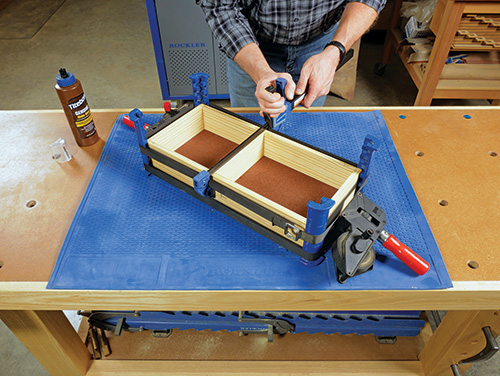
Now you can cut a 1/4″-thick deck panel to size — I used MDF for mine. Prepare a 3/4″-thick bottom panel, too. Then go ahead and dry-assemble the six carcass parts you’ve made up to this point to ensure that the box joints close properly with the deck and bottom panel in place. If they do, sand the inside faces of the front, back, side and bottom panels up to 180-grit.
How you’ll install the bottom panel in the carcass is entirely up to you. I decided to use biscuit joints and machined four evenly spaced #20 biscuit slots into the adjacent surfaces of the bottom and side panels for this purpose.
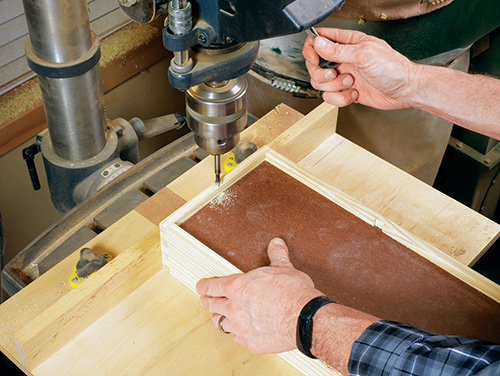
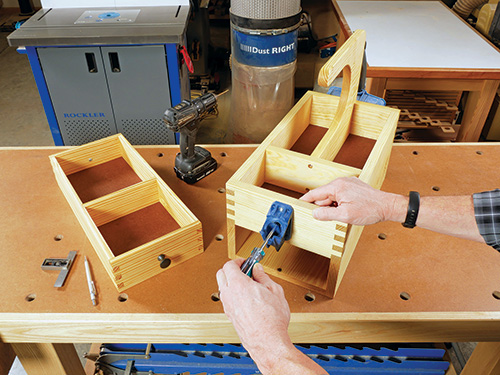
As you can see, the drawer can be opened from either end of the caddy. And since this project is intended to be carried where it’s needed, it’s a good idea to provide some provision for a drawer “catch.” Four 3/8″-dia. rare-earth magnets can accomplish this purpose nicely! We’ll embed two magnets in the top face of the bottom panel and do the same in the bottom edges of the drawer’s front and back pieces. This way, when the drawer is closed, the pairs of magnets will attract one another and hold the drawer in place. I used a 3/8″-dia. Forstner bit to drill shallow holes for the magnets in the inside face of the bottom panel and then glued the magnets into place with quick-setting two-part epoxy. Make sure the top faces of the magnets are flush with the panel’s face.
Next, spread glue over the pins and slots of the four box joints and into the biscuit slots, and clamp the carcass together with the deck, bottom panel and biscuits in place. When the glue cures, rip and crosscut two strips of 1/4″-thick scrap to create drawer guides. Glue and clamp them to the bottom of the deck inside the drawer “tunnel,” with their long outer edges flush against the carcass sides.
Adding the Handle
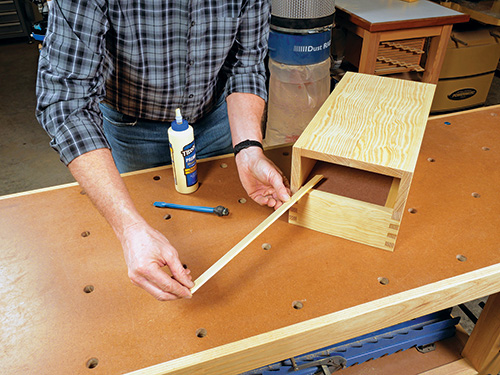
Cut a blank for the handle to size, as outlined in the Material List. If you’re building your caddy from solid lumber as I did, make sure to orient the grain direction so the long grain will be parallel to the handle’s top grip (the grain should run horizontally when the handle is in place on the caddy). Lay out the handle’s shape, using the Handle Drawing as a guide.
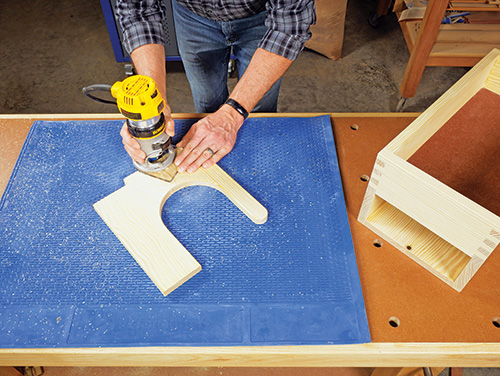
Now step over to your band saw to cut out the handle, or use a handheld jigsaw. Sand the cut edges and faces of the handle smooth. Then ease the sharp edges of the portion of the handle that will extend above the carcass with a router and 1/8″-radius roundover bit. Or break these edges with sandpaper.
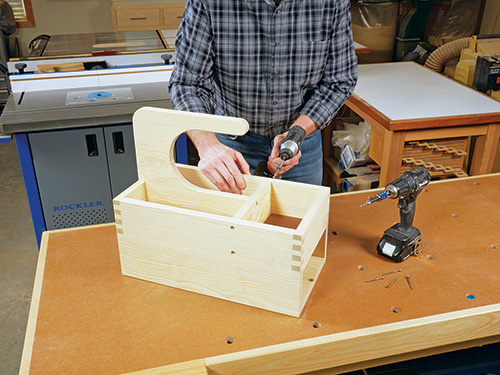
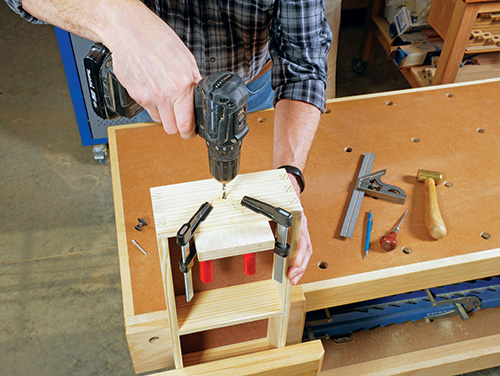
Cut a divider for the upper area of the caddy to size from 3/4″ material. It should fit snugly between the side walls of the carcass. Center the front end of the handle on the length of the divider, and fasten the parts together by driving #8 x 2″ countersunk screws through the divider and into the handle.
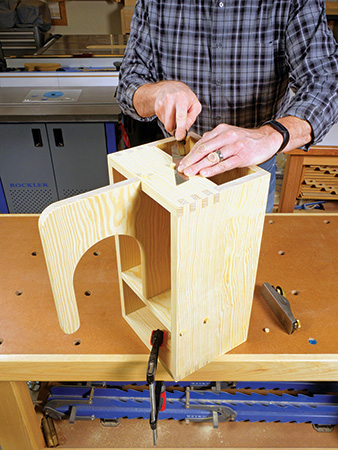
Slide the handle assembly into place on the caddy. Drive more countersunk screws through the sides and back of the caddy to secure the divider and back end of the handle. Cover the exposed screwheads, if you wish, with matching wood plugs. Trim the plugs flush and sand them smooth.
Assembling the Drawer
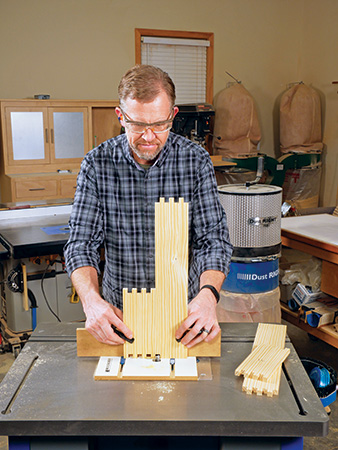
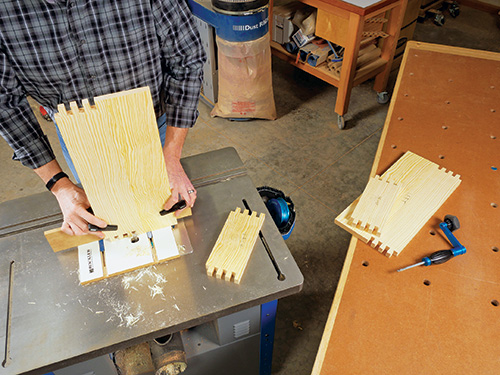
Joint and plane enough 1/2″ stock to make the drawer’s front, back, sides and drawer divider. Cut the parts to size. We’ll assemble the drawer with box joints to mimic those on the caddy. Set up your box joint-making system again, only this time, adjust the cutter height to 1/2″. I arranged the pattern so the drawer faces would have pins on their top and bottom edges. Mill all four corner joints.
Just as before with the carcass, dry-fit the corner joints. If all looks good, plow a 1/4″ x 1/4″ groove for the drawer’s bottom panel into the inside faces of all four parts. Locate these grooves 1/2″ up from the bottom edges of drawer workpieces. That placement enables you to rout the grooves along the full length of the drawer front and back. Stop the grooves 1/4″ in from the ends of the drawer sides so they won’t show.
I decided to install the drawer divider with dadoes rather than simply nail or screw it to the sides, because sometimes a rogue nail will go sideways when driven into such thin material. I used a 1/2″-wide dado blade set 1/8″ above the table to plow dadoes all the way across the width of the drawer sides for the divider panel. I located these dadoes 8-1/4″ from the same ends of the drawer sides.
edge of the drawer front and back for inserting
the second pair of magnets. Be sure to double-
check for correct polarity with the bottom
panel magnets before gluing these into place.
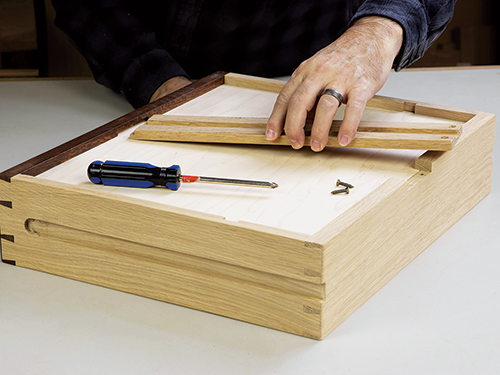
After you cut a 1/4″-thick bottom panel and a divider to size, fit all the drawer parts together without glue to make sure the joints close correctly. If they do, sand the inside faces of the parts up to 180-grit. Then glue and clamp the drawer together. Make sure the corners remain square under clamping pressure; the diagonal corner-to-corner measurements of the drawer should match.
Once the glue dries, mark and drill a centered hole into the bottom faces of the drawer front and back for the other pair of magnets. Epoxy them into place, but before you do that, make sure to orient them so their polarity will attract the magnets in the carcass bottom instead of repel them.
Finishing Up
Finish-sand the outer surfaces of the caddy and drawer, and break all sharp edges either with sandpaper or a 1/8″ roundover bit. Then measure and mark a center point on the outer faces of the drawer front and back, and bore a 3/16″-dia. hole through each for a machine screw to attach the drawer knobs.
Apply finish to your new caddy. I wiped on several coats of Rockler’s Sam Maloof Poly/Oil Finish — it’s an amber-toned oil/varnish blend — to make the most of the grain pattern and color of my caddy’s southern yellow pine.
When the topcoat cures, install the two drawer knobs and fill this handy shop project up with your collection of glues and applicators. I attached a hook to the back of the handle for hanging Rockler’s 5″ Glue Roller and mounted a Glue Bottle Dock to the front with a couple of machine screws.
Click Here to Download the Drawings and Materials List.
The post PROJECT: Gluing Supplies Caddy appeared first on Woodworking | Blog | Videos | Plans | How To.
]]>The post VIDEO: Slab Flattening with a Jig appeared first on Woodworking | Blog | Videos | Plans | How To.
]]>The post VIDEO: Slab Flattening with a Jig appeared first on Woodworking | Blog | Videos | Plans | How To.
]]>The post January/February 2024 What’s in Store appeared first on Woodworking | Blog | Videos | Plans | How To.
]]>The post January/February 2024 What’s in Store appeared first on Woodworking | Blog | Videos | Plans | How To.
]]>The post VIDEO: Cutting Circles and Ellipses appeared first on Woodworking | Blog | Videos | Plans | How To.
]]>The post VIDEO: Cutting Circles and Ellipses appeared first on Woodworking | Blog | Videos | Plans | How To.
]]>The post Woodworker’s Journal – January/February 2024 appeared first on Woodworking | Blog | Videos | Plans | How To.
]]>Tools: Handheld Routers, Nova Neptune DVR Lathe, Milk Paint
The post Woodworker’s Journal – January/February 2024 appeared first on Woodworking | Blog | Videos | Plans | How To.
]]>The post VIDEO: Make a Clock with Shaper Origin appeared first on Woodworking | Blog | Videos | Plans | How To.
]]>The post VIDEO: Make a Clock with Shaper Origin appeared first on Woodworking | Blog | Videos | Plans | How To.
]]>